Food Hunt Level 1093 Walkthrough & Answers
ExpertLevel 1093 video solution · published September 15, 2026
Watch on YouTube →- Difficulty
- Expert
- Colours on the board
- 9
- Biggest colour
- red 27.7%
- Clear from the start
- 0 - all walled off
- This page has
- Video + step-by-step
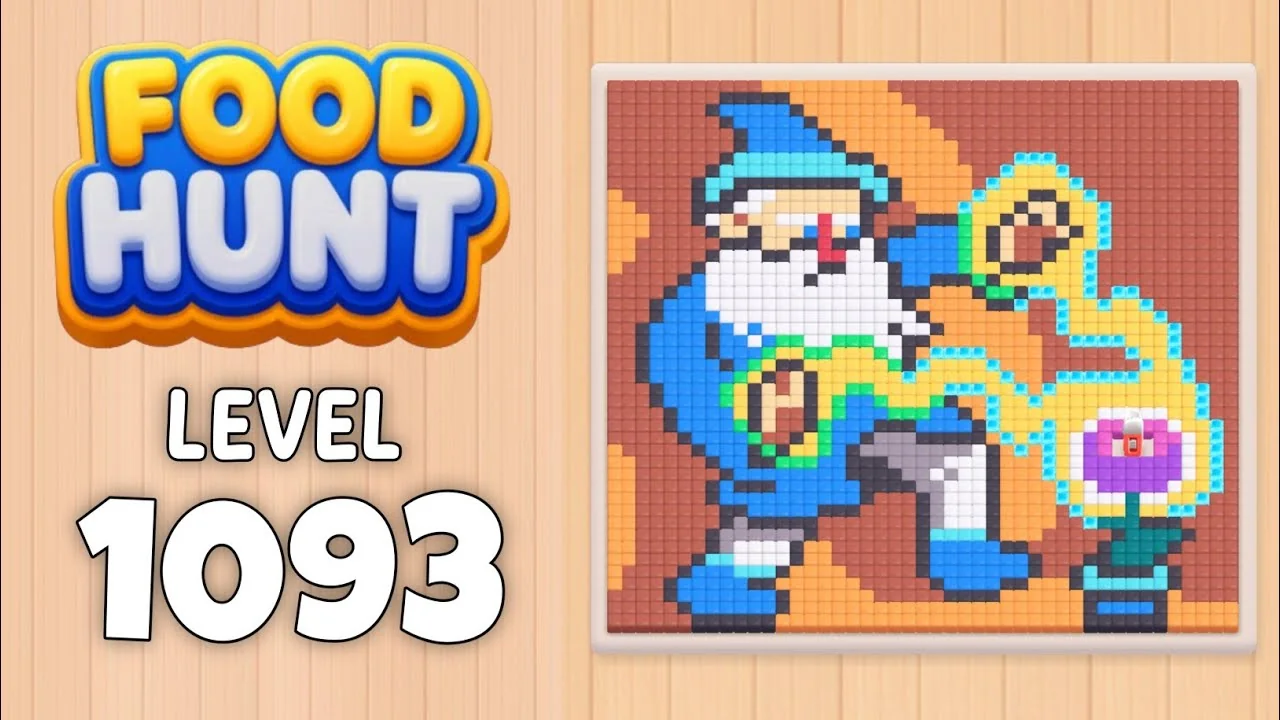
Blue Gnome with a Golden Crook
How do you beat level 1093? Follow the full 51-block clear of the blue gnome and its golden crook: slot 5 stays chained for the first 22 seconds, two White 22 blocks freeze in slots 4 and 2, a Blue 50 parks in slot 4 for three minutes, and the last tap is Green 22 at 6:00.5.

Level board
Step-by-step walkthrough
Prefer screenshots to video? Every phase of the clear is below in order, with the block counts and the frames they were taken from — keep it open next to the game and follow along tap by tap.
Level: 1093
Scene: A blue-hatted gnome with a white beard holding a golden crook, next to a pink flower in a teal pot, all drawn on a brick-red and orange background.
Colors in this level: ⬜ White · 🟧 Orange · 🟥 Salmon · 🟥 Red (patterned) · 🟨 Yellow · 🟨 Sand · 🟩 Green · 🩵 Cyan · 🟦 Blue · 💠 Teal · 🟣 Purple · 🟪 Mauve · 🟪 Magenta · 🩷 Rose · ⬛ Dark grey
How the Level Works
1. Tap a block in the bottom queue. It flies into the leftmost free slot. You cannot choose the slot, and no tap is possible while all five slots are full. 2. Ants of that colour eat every reachable matching pixel. The number printed on the block counts down; at 0 the block disappears and frees its slot. 3. The queue keeps four columns for the whole level. It drains but never re-centres. The rows further back are drawn faded, but every block in the queue is live. 4. Slot 5 is chained for the first 22 seconds. The chain icon sits over the fifth slot until about 0:22, so the level really starts with four usable slots. This is the single most important thing to know about 1093. 5. Count is the value on the first fully seated frame. Ants start eating while the block is still flying in, so the next frame is often 1-3 lower. The tables use the seated value. 6. Freezing is normal, not a bug. Blocks whose colour is walled in by other colours stop counting down and hold their slot for minutes. White 22 in slot 4 (0:13-0:30), Mauve 31 in slot 2 (1:14.5-4:16), Blue 50 in slot 4 (0:30-2:28) and Cyan 21 in slot 1 (1:58-5:13) are the four long ones here. 7. Sand and White blocks look like empty slots. They are the same pale colour as the empty rack, so they are easy to miss: the only tells are the raised lid and the number. Two of the blocks below (White 22 at 0:30 and Sand 34 at 4:44) are exactly this trap. 8. Same-colour swaps leave no empty frame. Salmon 69 -> Salmon 80 at 0:15.5 and Salmon 68 -> Salmon 70 at 0:16 are back-to-back replacements: the number jumps back up with no empty slot in between. 9. Two blocks are patterned. They have a red frame, a yellow-orange lining and a red speckled face, and they are the only blocks that eat the brick-red border.
Complete Block Order
Times are video time at 3x speed, to the nearest 0.5 s. Count is the value printed on the block when it settles into its slot.
Phase 1 - Opening Four (0:02-0:02.5)
Four taps fill the board in half a second: Orange 48 takes slot 1 and Salmon 69 slot 2, then Salmon 68 and Orange 50 take slots 3 and 4. Slot 5 is still chained, so the row has a hole in it from the start.
| # | Time | Color Block | Count |
|---|---|---|---|
| 1 | 0:02 | 🟧 Orange | 48 |
| 2 | 0:02 | 🟥 Salmon | 69 |
| 3 | 0:02.5 | 🟥 Salmon | 68 |
| 4 | 0:02.5 | 🟧 Orange | 50 |
Phase 2 - First Refill (0:12-0:16)
The Orange 48 in slot 1 runs out at about 0:11.5 and Salmon 74 drops in. At 0:13 the Orange 50 in slot 4 hits 0 and a White 22 takes its place - and immediately freezes, because the whites it wants are covered. The two Salmon blocks in slots 2 and 3 finish half a second apart and are swapped 1:1 for Salmon 80 and Salmon 70, with no empty frame in between. That is three brick-red blocks in a row doing the background.
| # | Time | Color Block | Count |
|---|---|---|---|
| 5 | 0:12 | 🟥 Salmon | 74 |
| 6 | 0:13 | ⬜ White | 22 |
| 7 | 0:15.5 | 🟥 Salmon | 80 |
| 8 | 0:16 | 🟥 Salmon | 70 |
Phase 3 - Slot Five Opens (0:22-0:35)
Slot 5 unlocks at about 0:22 and an Orange 50 goes in at once. It counts down to 5 and is then replaced at 0:29.8 by Yellow 78, the biggest yellow of the level. At 0:30 four taps land almost together: Salmon 4 in slot 1, a second White 22 in slot 2, Orange 10 in slot 3 and Blue 50 in slot 4 - the Blue 50 is what finally wakes the frozen White 22 out of slot 4. The White 22 in slot 2 then parks at 22 for eight seconds. A patterned Red 38 lands in slot 1 at 0:31.5 and a Green 23 in slot 3 at 0:34.5.
| # | Time | Color Block | Count |
|---|---|---|---|
| 9 | 0:22 | 🟧 Orange | 50 |
| 10 | 0:29.8 | 🟨 Yellow | 78 |
| 11 | 0:30 | 🟥 Salmon | 4 |
| 12 | 0:30 | ⬜ White | 22 |
| 13 | 0:30 | 🟧 Orange | 10 |
| 14 | 0:30 | 🟦 Blue | 50 |
| 15 | 0:31.5 | 🟥 Red (patterned) | 38 |
| 16 | 0:34.5 | 🟩 Green | 23 |
Phase 4 - The Brick-Red Wall (0:46-1:15)
Green 23 clears at 0:45.8 and Salmon 75 takes slot 3. The next half minute is mostly waiting: the Yellow 78 in slot 5 and the Blue 50 in slot 4 are chewing big areas, and nothing new lands until Magenta 10 in slot 1 at 0:59 and Orange 63 at 1:09. Then two blocks land together at 1:14.5-1:15: Mauve 31 in slot 2 - which then freezes at 31 for three minutes - and Yellow 65 in slot 3.
| # | Time | Color Block | Count |
|---|---|---|---|
| 17 | 0:46 | 🟥 Salmon | 75 |
| 18 | 0:59 | 🟪 Magenta | 10 |
| 19 | 1:09 | 🟧 Orange | 63 |
| 20 | 1:14.5 | 🟪 Mauve | 31 |
| 21 | 1:15 | 🟨 Yellow | 65 |
Phase 5 - Three Taps in a Minute (1:58-2:54)
The board is stuck behind frozen blocks, so this stretch is thin: Cyan 21 in slot 1 at 1:58 (it stays there until 5:13), Green 27 in slot 3 at 2:25 and Blue 50 in slot 3 at 2:54. Everything else on the screen is a block that has stopped counting.
| # | Time | Color Block | Count |
|---|---|---|---|
| 22 | 1:58 | 🩵 Cyan | 21 |
| 23 | 2:25 | 🟩 Green | 27 |
| 24 | 2:54 | 🟦 Blue | 50 |
Phase 6 - Dark Grey Run (3:40-4:01)
Teal 16 and Cyan 21 land in slots 5 and 4 at 3:40, then Purple 21 in slot 3 at 3:55.5. At 4:00.5 three more arrive in one burst: Cyan 21 in slot 3 and two dark greys in slots 4 and 5 (49 and 50). The dark greys are the ones that open up the gnome's outline, and they clear in about ten seconds each.
| # | Time | Color Block | Count |
|---|---|---|---|
| 25 | 3:40 | 🩵 Cyan | 21 |
| 26 | 3:40 | 💠 Teal | 16 |
| 27 | 3:55.5 | 🟣 Purple | 21 |
| 28 | 4:00.5 | 🩵 Cyan | 21 |
| 29 | 4:00.5 | ⬛ Dark grey | 49 |
| 30 | 4:00.5 | ⬛ Dark grey | 50 |
Phase 7 - Twin Drops (4:13.5-4:30)
Two blocks land back to back at 4:13.5: Sand 40 in slot 4 and White 56 in slot 5. The Sand 40 is easy to miss here - it is almost the same colour as an empty slot and it just sits at 40 for seventeen seconds before it starts counting. Dark grey 47 takes slot 2 at 4:23.5 and Salmon 68 slot 5 at 4:30.
| # | Time | Color Block | Count |
|---|---|---|---|
| 31 | 4:13.5 | 🟨 Sand | 40 |
| 32 | 4:13.5 | ⬜ White | 56 |
| 33 | 4:23.5 | ⬛ Dark grey | 47 |
| 34 | 4:30 | 🟥 Salmon | 68 |
Phase 8 - Four at Once (4:44-4:56)
At 4:44 four slots refill in the same second: Cyan 17 in slot 2, Sand 34 in slot 3, Blue 53 in slot 4 and White 22 in slot 5. This is the fastest burst of the level and the easiest to misread - the Sand 34 in slot 3 is another pale block that blends into the empty rack, and it drops to 32 and freezes there for sixteen seconds. The Blue 53 clears in ten seconds and Salmon 80 lands in slot 4 at 4:54.5; Dark grey 62 follows in slot 5 at 4:56. Note the white parcel and the red pin that drop in first - the dark grey block only appears with its number about half a second later.
| # | Time | Color Block | Count |
|---|---|---|---|
| 35 | 4:44 | 🩵 Cyan | 17 |
| 36 | 4:44 | 🟨 Sand | 34 |
| 37 | 4:44 | 🟦 Blue | 53 |
| 38 | 4:44 | ⬜ White | 22 |
| 39 | 4:54.5 | 🟥 Salmon | 80 |
| 40 | 4:56 | ⬛ Dark grey | 62 |
Phase 9 - The Last Eleven (5:11-6:00.5)
Green 23 in slot 4 and the second patterned Red 47 in slot 5 land together at 5:11, then Orange 50 takes slot 1 at 5:15. Blue 49 in slot 4 at 5:21.5, White 49 in slot 1 and Rose 4 in slot 2 at 5:32.5, Dark grey 48 in slot 4 at 5:50.5. The closing run is Salmon 80 in slot 2 at 5:57.5, Green 23 in slot 1 at 5:58, Yellow 31 in slot 3 at 5:58.5 and Green 22 in slot 4 at 6:00.5.
| # | Time | Color Block | Count |
|---|---|---|---|
| 41 | 5:11 | 🟩 Green | 23 |
| 42 | 5:11 | 🟥 Red (patterned) | 47 |
| 43 | 5:15 | 🟧 Orange | 50 |
| 44 | 5:21.5 | 🟦 Blue | 49 |
| 45 | 5:32.5 | ⬜ White | 49 |
| 46 | 5:32.5 | 🩷 Rose | 4 |
| 47 | 5:50.5 | ⬛ Dark grey | 48 |
| 48 | 5:57.5 | 🟥 Salmon | 80 |
| 49 | 5:58 | 🟩 Green | 23 |
| 50 | 5:58.5 | 🟨 Yellow | 31 |
| 51 | 6:00.5 | 🟩 Green | 22 |
Finale and Clear
The last tap is Green 22 at 6:00.5 in slot 4. The board is not empty yet: the patterned Red 47 that went into slot 5 at 5:11 is still working through the brick-red border on the right edge. It counts down to 1 by about 5:32 and then sits on 1 for thirty seconds while the last border pixels fall, finishing around 6:02. The gnome's last blue outline pixels go with the Green 23 in slot 1 at 5:58. The board is empty at 6:08.5 and the Level Complete screen appears at 6:09.5.
Quick Reference
Orange 48 -> Salmon 69 -> Salmon 68 -> Orange 50 -> Salmon 74 -> White 22 -> Salmon 80 -> Salmon 70 -> Orange 50 -> Yellow 78 -> Salmon 4 -> White 22 -> Orange 10 -> Blue 50 -> Red (patterned) 38 -> Green 23 -> Salmon 75 -> Magenta 10 -> Orange 63 -> Mauve 31 -> Yellow 65 -> Cyan 21 -> Green 27 -> Blue 50 -> Cyan 21 -> Teal 16 -> Purple 21 -> Cyan 21 -> Dark grey 49 -> Dark grey 50 -> Sand 40 -> White 56 -> Dark grey 47 -> Salmon 68 -> Cyan 17 -> Sand 34 -> Blue 53 -> White 22 -> Salmon 80 -> Dark grey 62 -> Green 23 -> Red (patterned) 47 -> Orange 50 -> Blue 49 -> White 49 -> Rose 4 -> Dark grey 48 -> Salmon 80 -> Green 23 -> Yellow 31 -> Green 22
Pro Tips
1. Do not plan around slot 5 before 0:22. The chain holds it shut, so the first four taps fill only four slots. Once it opens, three blocks land in the next thirteen seconds. 2. The two White 22 blocks are decoys. The first freezes in slot 4 from 0:13 to 0:30 and the second in slot 2 from 0:30 to 0:38. Both look like empty slots once the ants stop. Keep feeding the other slots and let them be rescued. 3. Blue 50 in slot 4 (0:30-3:39) is the block that eats the gnome. It sits frozen at 50 for two minutes and then counts down. Do not wait for it - everything else in the level keeps moving around it. 4. Two slots are walled off for most of the middle. Mauve 31 holds slot 2 from 1:14.5 to 4:16 and Cyan 21 holds slot 1 from 1:58 to 5:13. That is why only three taps land between 1:58 and 2:54. 5. Salmon is the workhorse. Ten of the 51 blocks are the deep brick-red Salmon that eats the background: 69, 68, 74, 80, 70, 4, 75, 68, 80, 80. If a slot frees up and the queue still has brick red, take it. 6. Watch the patterned reds. They look like a different block (red frame, yellow lining, red speckles) and they are the only ones that clear the brick-red border inside the frame. 38 at 0:31.5, 47 at 5:11. 7. Two blocks hide as empty slots. The Sand 40 at 4:13.5 and the Sand 34 at 4:44 are the same colour as the empty rack; only the lid and the number give them away. If a slot looks empty but the queue will not fill it, look again. 8. Bursts decide the middle. Four taps land inside one second at 0:30, three at 4:00.5 and four more at 4:44. Queue up the next block before a slot opens and these bursts happen by themselves.
Food Hunt Level 1093 — frequently asked questions
- What colours are on the Food Hunt Level 1093 board?
- The board image breaks down into 9 main colours, each covering at least 2% of it: red (#BE6659, 27.7% of the board), orange (#F7C062, 18.6% of the board), dark grey (#54505C, 15.5% of the board), blue (#3E8AED, 13.1% of the board), white (#F3EFF5, 8.1% of the board), cyan (#6BDDE9, 6.1% of the board), green (#25B38C, 3.9% of the board), grey (#A6B39F, 3.6% of the board) and pale orange (#E8D3A8, 3.5% of the board).
- Which colour should I clear first in Food Hunt Level 1093?
- red covers the most of the board at 27.7%, and orange is next at 18.6%. The step-by-step walkthrough above is this board's actual tap order; the colour shares here are only what each colour costs to clear.
- What difficulty is Level 1093 in Food Hunt: Pixel Puzzle?
- Level 1093 is rated Expert difficulty in Food Hunt: Pixel Puzzle.
- Is there a video walkthrough for this Food Hunt level?
- Yes — the walkthrough video on this page plays the full clear of this board, so you can follow the tap order block by block. The board image next to it shows what the finished picture is made of.
More expert walkthroughs
View all →
Featured walkthroughs
The levels players search for most - each with a full video guide.